注册GitHub
注册你的username和邮箱,邮箱十分重要,GitHub上很多通知都是通过邮箱的。
注册过程比较简单,详细也可以看:
一步步在GitHub上创建博客主页 全系列 by pchou(推荐)
配置和使用Github
以下教程主要参考beiyuu的《使用Github Pages建独立博客》写成。
配置SSH keys
我们如何让本地git项目与远程的github建立联系呢?用SSH keys。
检查SSH keys的设置
首先我们需要检查你电脑上现有的ssh key:
$ cd ~/. ssh 检查本机的ssh密钥
如果提示:No such file or directory 说明你是第一次使用git。
生成新的SSH Key:
$ ssh-keygen -t rsa -C "邮件地址@youremail.com"
Generating public/private rsa key pair.
Enter file in which to save the key (/Users/your_user_directory/.ssh/id_rsa):<回车就好>
注意1: 此处的邮箱地址,你可以输入自己的邮箱地址;注意2: 此处的「-C」的是大写的「C」
然后系统会要你输入密码:
Enter passphrase (empty for no passphrase):<输入加密串>
Enter same passphrase again:<再次输入加密串>
在回车中会提示你输入一个密码,这个密码会在你提交项目时使用,如果为空的话提交项目时则不用输入。这个设置是防止别人往你的项目里提交内容。
最后看到这样的界面,就成功设置ssh key了:

添加SSH Key到GitHub
在本机设置SSH Key之后,需要添加到GitHub上,以完成SSH链接的设置。
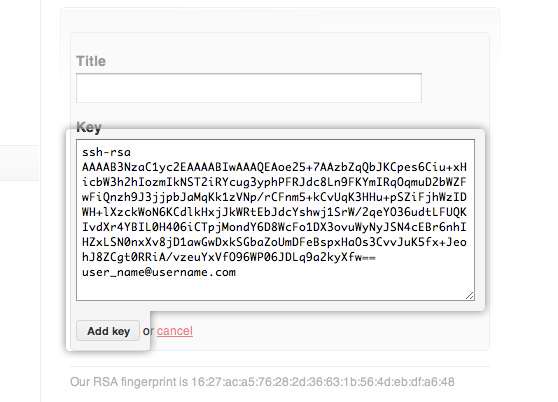
1、打开本地C:\Documents and Settings\Administrator.ssh\id_rsa.pub文件。此文件里面内容为刚才生成人密钥。如果看不到这个文件,你需要设置显示隐藏文件。准确的复制这个文件的内容,才能保证设置的成功。
2、登陆github系统。点击右上角的 Account Settings—>SSH Public keys —> add another public keys
3、把你本地生成的密钥复制到里面(key文本框中), 点击 add key 就ok了
可以输入下面的命令,看看设置是否成功,git@github.com的部分不要修改:
$ ssh -T git@github.com
如果是下面的反馈:
The authenticity of host 'github.com (207.97.227.239)' can't be established.
RSA key fingerprint is 16:27:ac:a5:76:28:2d:36:63:1b:    56:4d:eb:df:a6:48.
Are you sure you want to continue connecting (yes/no)?
不要紧张,输入yes就好,然后会看到:
Hi cnfeat! You've successfully authenticated, but GitHub does not provide shell access.
设置用户信息
现在你已经可以通过SSH链接到GitHub了,还有一些个人信息需要完善的。
Git会根据用户的名字和邮箱来记录提交。GitHub也是用这些信息来做权限的处理,输入下面的代码进行个人信息的设置,把名称和邮箱替换成你自己的,名字必须是你的真名,而不是GitHub的昵称。
$ git config --global user.name "cnfeat"//用户名
$ git config --global user.email  "cnfeat@gmail.com"//填写自己的邮箱
SSH Key配置成功
本机已成功连接到github。
若有问题,请重新设置。常见错误请参考:
GitHub Help - Generating SSH Keys
GitHub Help - Error Permission denied (publickey)
使用GitHub Pages建立博客
与GitHub建立好链接之后,就可以方便的使用它提供的Pages服务,GitHub Pages分两种,一种是你的GitHub用户名建立的username.github.io这样的用户&组织页(站),另一种是依附项目的pages。
想建立个人博客是用的第一种,形如cnfeat.github.io这样的可访问的站,每个用户名下面只能建立一个。
github上建立仓库
登录后系统,在github首页,点击页面右下角「New Repository」
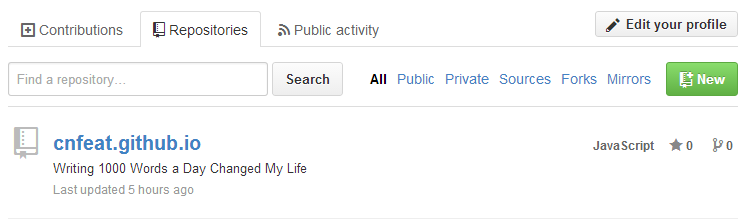
填写项目信息:
project name:cnfeat.github.io
description: Writing 1000 Words a Day Changed My Life
注:Github Pages的Repository名字是特定的,比如我Github账号是cnfeat,那么我Github Pages Repository名字就是cnfeat.github.io。

点击「Create Repository」 完成创建。
详细可以看这里:一步步在GitHub上创建博客主页(2)
用Hexo克隆主题
Hexo介绍
Hexo的作者是tommy351,根据官方介绍,Hexo是一个简单、快速、强大的博客发布工具,支持Markdown格式。
安装Hexo
打开git。
$ npm install -g hexo
部署Hexo
在我的电脑中建立一个名字叫「Hexo」的文件夹,然后在此文件夹中右键打开Git Bash。
$ hexo init
Hexo随后会自动在目标文件夹建立网站所需要的所有文件。
复制cnfeat的主题
建立了Hexo文件之后就可以复制我的主题了
$ git clone https://github.comcnfeat/cnfeat.git themes/jacman
如果不行,可以复制wuchong的修改的主题,我的就是复制他的修改的。
$ git clone https://github.com/wuchong/jacman.git themes/jacman
或者复制yangjian的
$ git clone https://github.com/A-limon/pacman.git themes/pacman
启用cnfeat的主题
修改Hexo目录下的config.yml配置文件中的theme属性,将其设置为jacman。同时请设置stylus属性中的compress值为true。
更新主题
$ cd themes/jacman
$ git pull
注意:为避免出错,请先备份你的_config.yml 文件后再升级
本地查看调试
$ hexo g #生成
$ hexo s #启动本地服务,进行文章预览调试
或者直接作用组合命令
$ hexo d -g
浏览器输入http://localhost:4000,查看搭建效果。此后的每次变更_config.yml 文件或者上传文件都可以先用此命令调试,非常好用,尤其是当你想调试出自己想要的主题时。
将独立域名与GitHub Pages的空间绑定
GitHub Pages的设置
方法一:在Repository的根目录下面,新建一个名为CNAME的文本文件,里面写入你要绑定的域名,比如cnfeat.com。
方法二:到我的github仓库,点击右下角的「Download ZIP」,下载源文件,解压,修改CNAME,改成你想要的域名,放进Hexo\source目录下,用hexo命令提交上去。
$ hexo d -g
DNS设置
用DNSpod,快,免费,稳定。
注册DNSpod,添加域名,如下图设置。
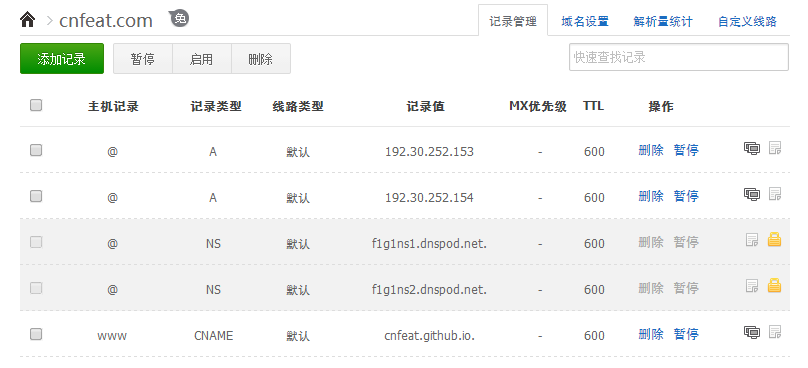
其中A的两条记录指向的ip地址是github Pages的提供的ip
192.30.252.153
192.30.252.154
如博客不能登录,有可能是github更改了空间服务的ip地址,记得及时到在GitHub Pages查看最新的ip即可
www指定的记录是你在github注册的仓库。
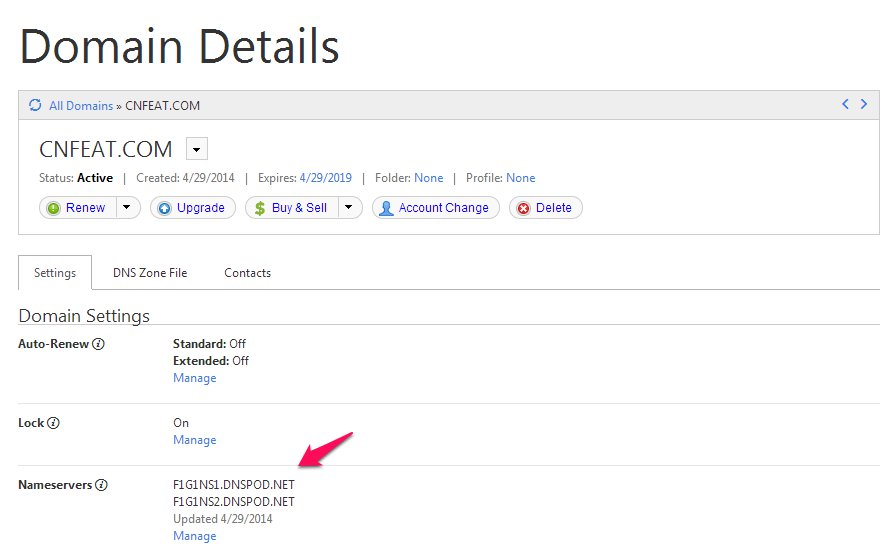
去Godaddy修改DNS地址
更改godaddy的Nameservers为DNSpod的NameServers。
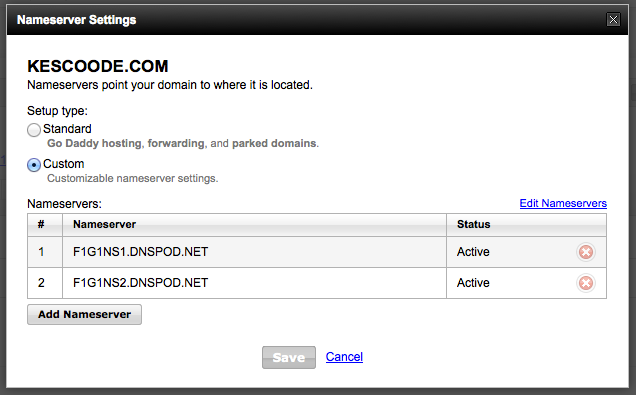
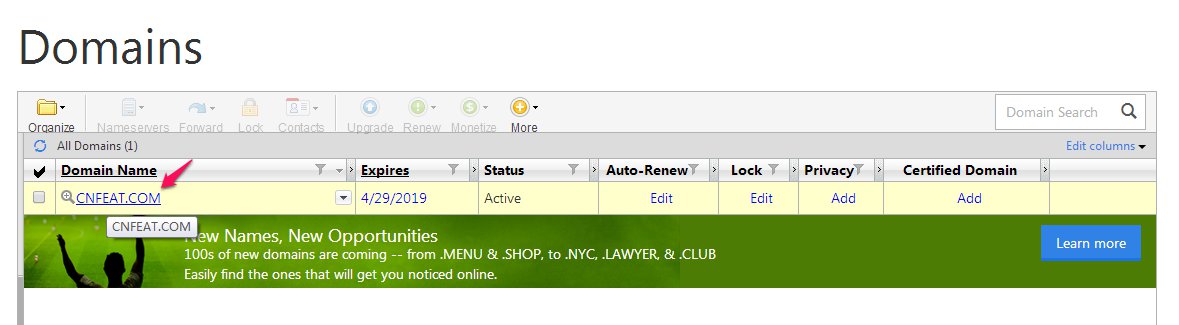
1、点击「My Account」,管理我的域名。
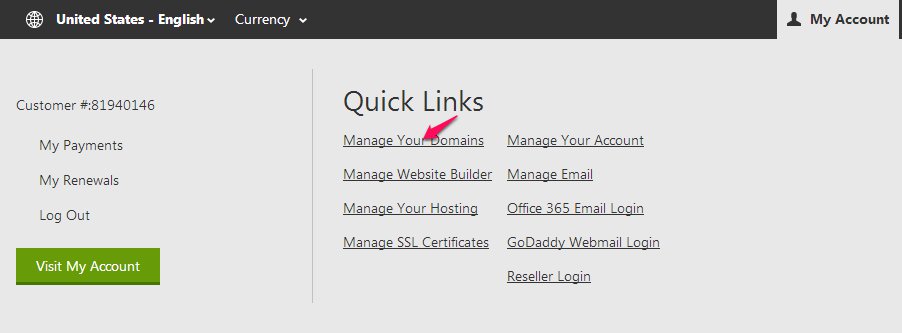
2、点击域名。
3、将godaddy的Nameservers更改成f1g1ns1.dnspod.net和f1g1ns2.dnspod.net
如有不详看可以看DNSpod提供的官方帮助
详细也可以看这里:一步步在GitHub上创建博客主页(3)
搭建完成
至此,独立博客就算搭建完成,如需进步一完善请在参看以下文章或博客下留言。
Pacman主题介绍 by yangjian
使用hexo搭建博客 by yangjian
hexo系列教程:(二)搭建hexo博客 by zippera(推荐)
hexo系列教程:(三)hexo博客的配置、使用by zippera(推荐)
进阶篇:Hexo设置
网站搭建完成后,就可以根据自己爱好来对Hexo生成的网站进行设置了,对整站的设置,只要修改项目目录的_config.yml就可以了,这是我的设置,可供参考。
# Hexo Configuration
## Docs: http://hexo.io/docs/configuration.html
## Source: https://github.com/tommy351/hexo/

# Site #整站的基本信息
title: 1000 words a Day #网站标题
subtitle: Writing 1000 Words a Day Changes My Life #网站副标题
description: 学习总结 思考感悟 知识管理 #网站描述
author:  cnFeat #网站作者,在下方显示
email: cnFeat@gmail.com #联系邮箱
language: zh-CN

# URL
## If your site is put in a subdirectory
url: http://www.cnfeat.com #你的域名
root: /
permalink: :year/:month/:day/:title/
tag_dir: tags
archive_dir: archives
category_dir: categories
code_dir: downloads/code

# Directory
source_dir: source
public_dir: public

# Writing
new_post_name: :title.md # File name of new posts
default_layout: post
auto_spacing: false # Add spaces between asian characters and western characters
titlecase: false # Transform title into titlecase
external_link: true # Open external links in new tab
max_open_file: 100
multi_thread: true
filename_case: 0
render_drafts: false
post_asset_folder: false
highlight:
  enable: true
  line_number: true
  tab_replace:

# Category & Tag
default_category: uncategorized
category_map:
tag_map:

# Archives
## 2: Enable pagination
## 1: Disable pagination
## 0: Fully Disable
archive: 2
category: 2
tag: 2

# Server
## Hexo uses Connect as a server
## You can customize the logger format as defined in
## http://www.senchalabs.org/connect/logger.html
port: 4000
server_ip: 0.0.0.0
logger: false
logger_format:

# Date / Time format
## Hexo uses Moment.js to parse and display date
## You can customize the date format as defined in
## http://momentjs.com/docs/#/displaying/format/
date_format: YYYY-MM-DD
time_format: H:mm:ss

# Pagination
## Set per_page to 0 to disable pagination
per_page: 15 #每页15篇文章
pagination_dir: page

# Disqus #社会化评论disqus,我使用多说,在主题中配置
disqus_shortname:

# Extensions
## Plugins: https://github.com/tommy351/hexo/wiki/Plugins
## Themes: https://github.com/tommy351/hexo/wiki/Themes
theme: jacman
exclude_generator:
Plugins:
- hexo-generator-feed
- hexo-generator-sitemap

#sitemap
sitemap:
path: sitemap.xml

#Feed Atom
feed:
type: atom
path: atom.xml
limit: 20

# Markdown
## https://github.com/chjj/marked
markdown:
gfm: true
pedantic: false
sanitize: false
tables: true
breaks: true
smartLists: true
smartypants: true

# Stylus
stylus:
compress: false

# Deployment
## Docs: http://hexo.io/docs/deployment.html
deploy:
type: github
repository: https://github.com/cnfeat/cnfeat.github.io.git
branch: master
修改局部页面
页面展现的全部逻辑都在每个主题中控制,源代码在hexo\themes\jacman\中:
.
├── languages  #多语言
|   ├── default.yml#默认语言
|   └── zh-CN.yml  #中文语言
├── layout #布局,根目录下的*.ejs文件是对主页,分页,存档等的控制
|   ├── _partial   #局部的布局,此目录下的*.ejs是对头尾等局部的控制
|   └── _widget#小挂件的布局,页面下方小挂件的控制
├── source #源码
|   ├── css#css源码
|   |   ├── _base  #*.styl基础css
|   |   ├── _partial   #*.styl局部css
|   |   ├── fonts  #字体
|   |   ├── images #图片
|   |   └── style.styl #*.styl引入需要的css源码
|   ├── fancybox   #fancybox效果源码
|   └── js #javascript源代码
├── _config.yml#主题配置文件
└── README.md  #用GitHub的都知道
发表新文章
用hexo发表新文章
$ hexo n #写文章
其中my new post为文章标题,执行命令后,会在项目\source_posts中生成my new post.md文件,用编辑器打开编写即可。
当然,也可以直接在\source_posts中新建一个md文件,我就是这么做的。
写完后,推送到服务器上,执行
$ hexo g #生成
$ hexo d #部署 # 可与hexo g合并为 hexo d -g
用Hexo发表文章的Markdown语法
使用jacman或pacman主题,建议按此标准语法写:
title: postName #文章页面上的显示名称,可以任意修改,不会出现在URL中
date: 2013-12-02 15:30:16 #文章生成时间,一般不改,当然也可以任意修改
category: example #分类
tags: [tag1,tag2,tag3] #文章标签,可空,多标签请用格式,注意:后面有个空格
description: 附加一段文章摘要,字数最好在140字以内。
---

以下正文
Hexo命令
常用命令:
hexo new "postName" #新建文章
hexo new page "pageName" #新建页面
hexo generate #生成静态页面至public目录
hexo server #开启预览访问端口(默认端口4000,'ctrl + c'关闭server)
hexo deploy #将.deploy目录部署到GitHub
######常用复合命令:
hexo d -g #生成加部署
hexo s -g #预览加部署
简写:
hexo n == hexo new
hexo g == hexo generate
hexo s == hexo server
hexo d == hexo deploy
安装插件
添加sitemap和feed插件
$ npm install hexo-generator-sitemap
$ npm install hexo-generator-feed
修改_config.yml,增加以下内容
# Extensions
Plugins:
- hexo-generator-feed
- hexo-generator-sitemap

#Feed Atom
feed:
type: atom
path: atom.xml
limit: 20

#sitemap
sitemap:
path: sitemap.xml
Hexo上传README文件
Github的版本库通常建议同时附上README.md说明文件,但是hexo默认情况下会把所有md文件解析成html文件,所以即使你在线生成了README.md,它也会在你下一次部署时被删去。怎么解决呢?
在执行hexo deploy前把在本地写好的README.md文件复制到.deploy文件夹中,再去执行hexo deploy。
404页面
GitHub Pages有提供制作404页面的指引:Custom 404 Pages 。
直接在根目录下创建自己的404.html或者404.md就可以。但是自定义404页面仅对绑定顶级域名的项目才起作用,GitHub默认分配的二级域名是不起作用的,使用hexo server在本机调试也是不起作用的。
推荐使用腾讯公益404。